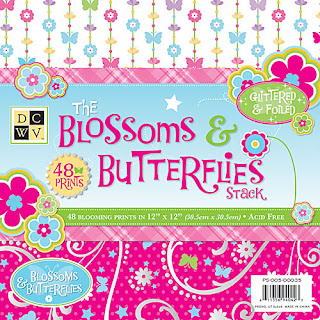
This is a beautiful and fun stack. I love using it in my projects and just looking at it is inspiring. DCWV's paper stacks are always very high quality and this is no exception. The bright colors are good for any happy and cheerful projects. The designs are primarily feminine so it's not quite an 'all occasion' stack but for anything girly it's a great set.
Die Cuts With a View
Whimsical Designs
Friday, April 8, 2011
Tuesday, April 5, 2011
Composition Book
Anyone who does crafts knows the price of materials can get pretty extreme. When you get really into the arts n' crafts mode even the idea of mortgaging the house doesn't sound so crazy. The truth is, you don't have to spend an arm and a leg just to provide yourself with something to embellish. Look around at all of the things in your house, your office, even your purse, so many of these are probably run-of-the-mill supplies for everyday life that you don't really notice and probably aren't worth noticing...Yet! Now get your creative cap on and make everything that's boring into something brilliant and original!
I did just that with one of the most common and boring items you can find. Everyone has probably, sometime it their life, had to use these ugly pieces of standardized equipment. Yes, that's right, I'm referring here to the dreaded 'Composition Book'. Let's make this into something worth looking at!
In the beginning.
This is the front of the book. I've given it an edge of solid cream colored paper and tore away the edge of the main sheet of patterned paper to give the edge a down to earth, rustic, kind of feel.
This is the back cover. I did the same basic thing as the front but with a different patterned paper (still coordinating) and changed which edge is torn away.
Now this something that is enjoyable to use and if you leave it laying around it can double as a decoration! Having beautiful things around you is something that makes your day a bit brighter and your home a bit more pleasant. Plus, it will give you no end of projects to do, which will keep you busy on those rainy days. ;)
I did just that with one of the most common and boring items you can find. Everyone has probably, sometime it their life, had to use these ugly pieces of standardized equipment. Yes, that's right, I'm referring here to the dreaded 'Composition Book'. Let's make this into something worth looking at!
In the beginning.
 | ||||
| Composition Book ( Yuck!!! ) |
This is the front of the book. I've given it an edge of solid cream colored paper and tore away the edge of the main sheet of patterned paper to give the edge a down to earth, rustic, kind of feel.
This is the back cover. I did the same basic thing as the front but with a different patterned paper (still coordinating) and changed which edge is torn away.
Now EMBELLISH AWAY!!!!!!
Now this something that is enjoyable to use and if you leave it laying around it can double as a decoration! Having beautiful things around you is something that makes your day a bit brighter and your home a bit more pleasant. Plus, it will give you no end of projects to do, which will keep you busy on those rainy days. ;)
Monday, April 4, 2011
'Life is Simple' card
This card has a very elegant design which almost contradicts but really maintains the statement that 'life is simple'. The hues are gold and blue with off-white pulling it all together.
4.25" / 6"
Sunday, April 3, 2011
'Happy Anniversary' card
This is just a simple Anniversary card for anyone who needs to commemorate that special day.Its colors are gender neutral but even its simplicity adds to the overall elegance.
I used 'Natural Cream' textured cardstock for the body of the card and the mat for the text. The background is K 'n Company patterned paper and the text is embossed gold foil.
Friday, April 1, 2011
The making of 'Little Lady'
I started this project with a wooden picture frame from the Dollar Store, it sat on my shelf of supplies I don't use for years and I just felt a need to decorate it with something!
1.) I started by painting the entire wood area black, this keeps all of the areas not covered in paper matching the theme and colors of the project.
2.) After laying them out to give myself an idea of what the layout would be, I measured and cut all of the papers and ribbons that I'd need.
3.) I then applied the decoupage to the wood and placed the papers in their spaces. I used several coats of decoupage to ensure they would stay in position and remain sealed under the clear coat.
4.) Details!! Now goes all of the ribbons and letters, all the little accents that complete the project. I glued the paper tag and the ribbon and covered them with the same clear coat that I used in the decoupage so they have the maximum strength possible. Finally, the little rhinestones go on and, Done!
Memories from the Past
Monday, March 28, 2011
Hello!
Welcome to the Whimsical Designs blog! I'm glad you dropped by. I love visitors! I want this to be an interesting experience that will give you a better perspective on my process as well as my work. Maybe you know me from my ArtFire or Etsy stores and just wanted to see what it's like on 'the inside'. Here's how I work, and how I spend most of my time not working :) who wants to work? All the time I spend creating things is just my play time. I hope you'll come again and let me show you something new. See ya next time!
Subscribe to:
Comments (Atom)


